Amazingly Raku - Part 5: The First Game
[94.5] Published 9. December 2020.See also: The Introduction | Part 1: The Maze | Part 2: The Path | Part 3: The Wall | Part 4: The Class.
Traversing the Maze - Manually
 I had thought about making an actual game out of the mazes, but did not do anything
about it before I bought (and read) J.J. Merelo's
Raku Recipes, A Problem-Solution
Approach. (If you want a pun, you could consider the game a pipe dream, until I
read this book. As the maze is constructed of pipe symbols...)
I had thought about making an actual game out of the mazes, but did not do anything
about it before I bought (and read) J.J. Merelo's
Raku Recipes, A Problem-Solution
Approach. (If you want a pun, you could consider the game a pipe dream, until I
read this book. As the maze is constructed of pipe symbols...)
Recipe 13-2 presented the «GTK::Simple» module, using GTK3 to make windows and other GUI elements. But the module does not support keyboard interrupts, so it is impossible to use it to make a game responding to user input (keypresses).
But the recipe just before it (number 13-1) presented the «Termbox» module, using the shell as a two dimentional matrix that we can print characters to. And it supports keyboard interrupts as well. So I had a go at that instead...
This part focuses more on the functionality («how to play the game») than the actual code, but some code snippets have found their way here.
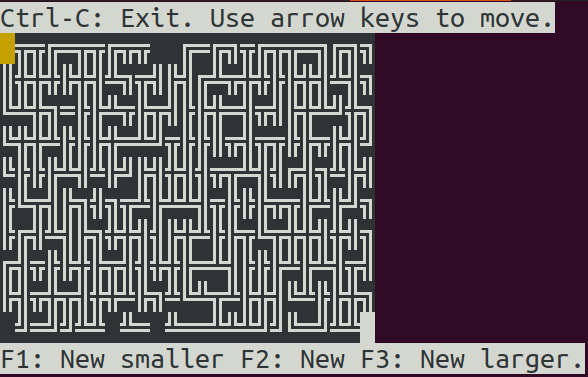
amazing-termbox
The game will generate a random maze for you, unless you specify a maze file on the command line. The generated mazes will always be traversable. The default size is 25 rows and columns, but this can be changed with the «-b», «-c» and «-r» command line options - in the same way as with the «mazemaker» program.
$ ./amazing-termbox -b=10 -c=25
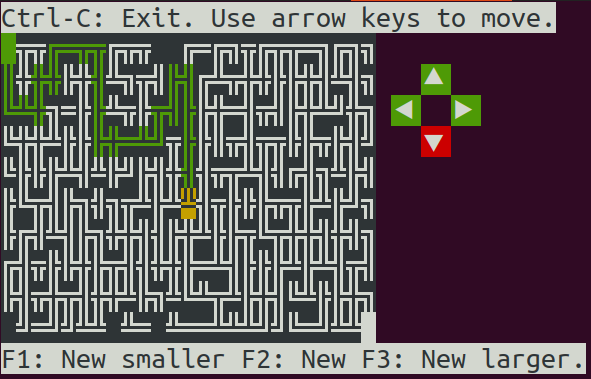
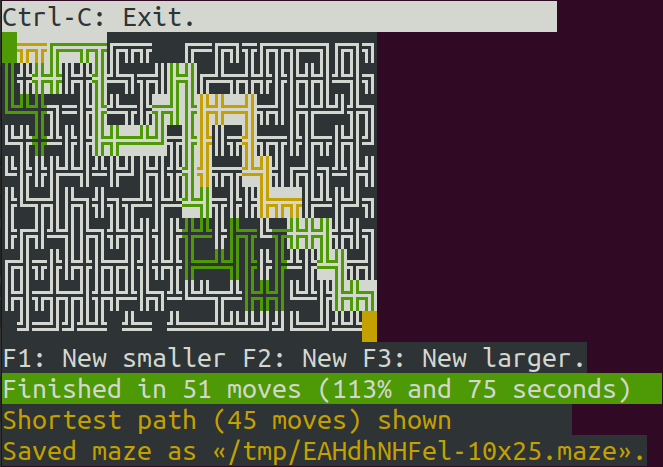
You start out in the upper left corner (the entrance), and the goal is to reach the lower right corner (the exit). The current position is shown in yellow, initially at the entrance.
You can start a new game with the «F1» (smaller), «F2» (same size) and «F3» (larger) keys, but only when you are at the entrance or the exit. Use Control-C to exit the program at any time.
Navigate with the arrow keys on the keyboard. You can (obviously) only follow existing paths.
The path that you have taken is highlighted in green, to make it easier to navigate. (But this can be disabled with the «-n» command line option).
This is the procedure used to set the value and colour of a cell. Note that the value passed
is the UTF-8 value, and not the character itself. (Thus the ord call.) The back-
and foreground colours are specified as well.
sub set-maze-cell ($row, $col, $bgcolor, $fgcolor)
{
  tb-change-cell($col, $row +1, $m.maze[$row][$col].ord, $bgcolor, $fgcolor);
}
(The $row +1 is there to compensate for the text line above the maze.)
See
docs.raku.org/routine/ord
for more information about ord.
The visual aid to the right of the maze shows the directions available from the current position, and has been enabled with the «-d» command line option. This can be helpful if the font size in the shell is smallish. (You are probably better off increasing the font size of your terminal window.)
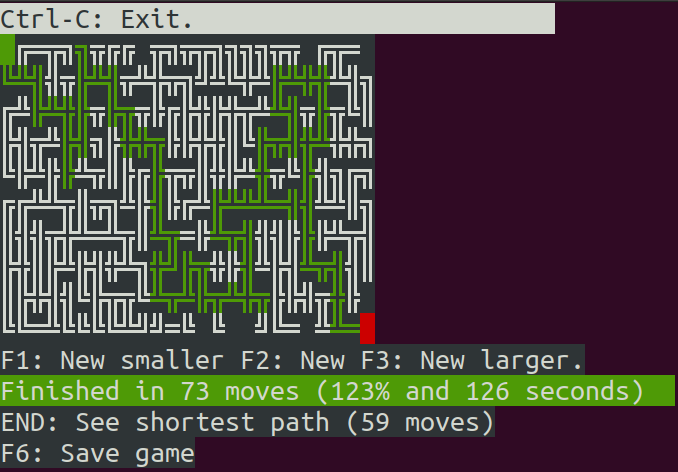
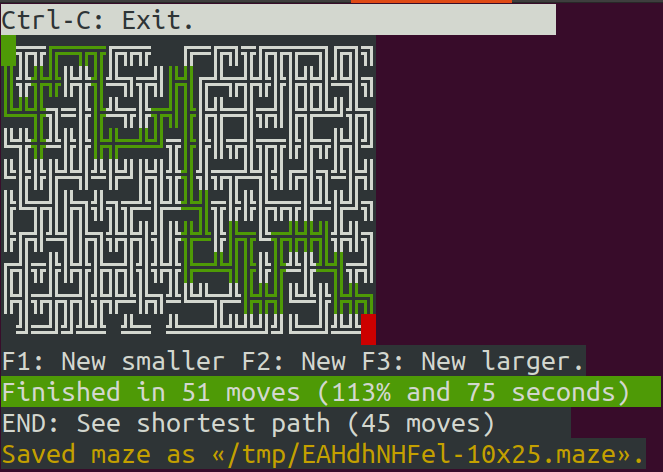
You get a summary (printed with green background) when you have traversed the maze. You can also save the maze for later with the «F6» key.
Note the filename. The maze size (rows and columns) are included in the filename.
Press the «End» key to highlight the shortest path.
sub show-shortest-path ($path)
{
  my $row = 0;
  my $col = 0;

  set-maze-cell($row, $col, TB_GREEN, TB_WHITE);

  for $path.comb -> $direction
  {
    if    $direction eq "N" { $row--; }
    elsif $direction eq "S" { $row++; }
    elsif $direction eq "E" { $col++; }
    elsif $direction eq "W" { $col--; }

    @visited[$row][$col]
      ?? set-maze-cell($row, $col, TB_GREEN, TB_WHITE)
      !! set-maze-cell($row, $col, TB_YELLOW, TB_WHITE);
  }
}
The «@visited» array has the cell set to «True» when we visit the cell, so we have a record of where the user has been. (The player has this information in the form of the green path on screeen.) Then we add colour to the shortest path, using white background on it. The symbols are green for those visited by the player, and yellow otherwise. The result is not optimal, so is subject to change.
Note that the shortest path is easier to see if you run the «maze-solver-spa» program (but that requires that you save the maze first):
$ maze-solver-spa -s -h /tmp/EAHdhNHFel-10x25.maze
Path: EESENEEESSSEEEENENESSSSENNNEEESSESEESEESESEES
  (with length 45)
█╦╦╔═╦╦╔╦╦  ╔═╔╗╦╔╦╦═╗╔╗╗
║╬╬╬╠╬╣╩╗╦╣╠╣╔╩╦╬╬╠╠╬╣╩╣╗
╚╩╬╗═╠╠╩╦╠╦╣╠╠╬═╣╦╣╠╬╩╝╬╗
╚╬╬╩╠╠╠╬═╩╝╦╠╠║╦╣╦╦╠╠╦╠╣╝
╚╠╠╠╩╣╩╠╝╠╣╬╣╣╦╦╩╣╣╔╣╗╩╠╣
╠╚╦╣╠╗╣╗╦╩╠╩╩╣╦╠╠╠╦╦╠╩╠╝╗
╠╔╣╩╣╠╗╬╬╣╣╠╬╩╠╠╦╚╦╬╬╣╬╣╗
╔╣╦╠╠╬╠╦╣╣╬╬╠═╩╣╠╠╠╩╠╩╣╦╣
╠╣╦╬╦╣╬╬╩╠╗╩╚╩╦╩╠╬╣╚╩╠╠╬╗
 ╝═╝╝╩╩ ╩═ ╩══╩╩╩╝╝╚═╝╩╩█
The game is fully playable.
Note that installing the «Termbox» module will probably fail on Windows.
The description above tells only part of the story. You can get the full list of options by running the program with the «-h» (or «--help») command line option:
$ ./amazing-termbox -h
…
Part 6: The Second Game
See the next part; Part 6: The Second Game where I present another game where the user can have a go at traversing mazes, this time with a graphical user interface.